Digital Art
Audrey Omen
Henry Moss Middle School, 8th grade
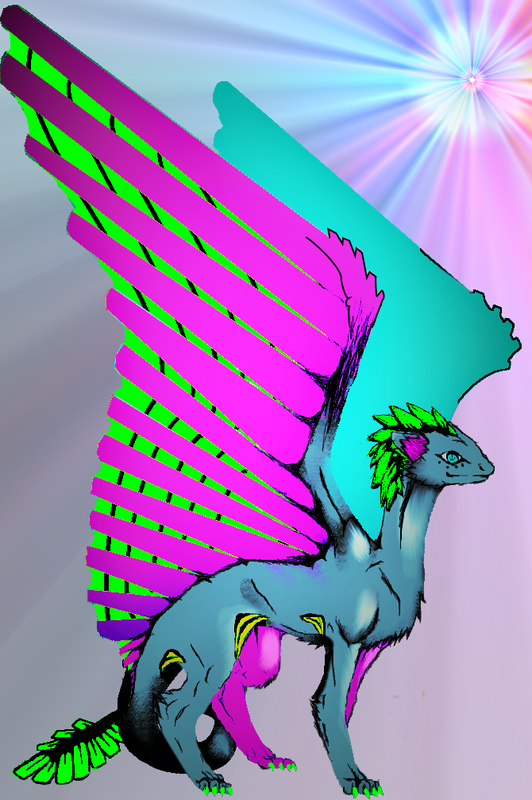
Nostalgia Dragon ~ Digital Art
I first drew the dragon on a sheet of printer paper and took a picture of it with my computer. I opened GIMP 2.8.10 (a paint program) and opened the file to the picture. Then I opened a new GIMP page and started to draw the figure with a grey color on the paint tool, like a rough sketch that wasn’t very well detailed. Then I used the rope tool to trace the outside, in the color blue, and made the line 3 pixels big.
Next I added details: the eyes, mouth, and all the realistic stuff. Then I started to add color to the body, which I don’t know why, erased the details. I colored the eyes and the rest then I re-added the details, except a little darker. Then I added some tint and shade to the body and smeared it to make it look as if it had fur. I made the tail dark with light in some spots to make it look like it’s actually behind the legs.
Next I did the wings, A.K.A. the hardest part! I held shift while using the paint tool so it would make straight lines (for the neon green part of the wing), then I used the enhancing tool to select the rest of the wing to make it a pink and purple gradient. I thought the wing would look a bit better if I added black stripes curving to the shape of the wing into it. I didn’t exactly know what to do with mixing the blue and the pink together so I added black to make the pink look like it has shape. I made the limb of the wing mix in the pink with black as well, and I made it to look as if the top “feather” was a part of that limb. I didn’t think it would look good if the other wing, the one in the background was the same color, so I added a black and blue gradient to it.
After a while of thinking what to do to make the picture a little more detailed, I made its chest and stomach have fur. I also added a collarbone and a small sign of its ribs to show that it’s a fair, normal sized dragon. I thought its hind legs would be pink so the blue color wouldn’t be boring.
So I got “done” after adding the rest of the colors, I got on Windows Photos and made the dragon a little brighter than it was, and I made the tip of the first wing darker. I went back to GIMP and reopened the picture, went to Filters, then went to Light and Shadow, and added three super novae, a large one, a medium sized one, and a small one at the top right of the picture for the background so it would look like a time portal.
Samoa Gaoa
Henry Moss Middle School, 7th grade
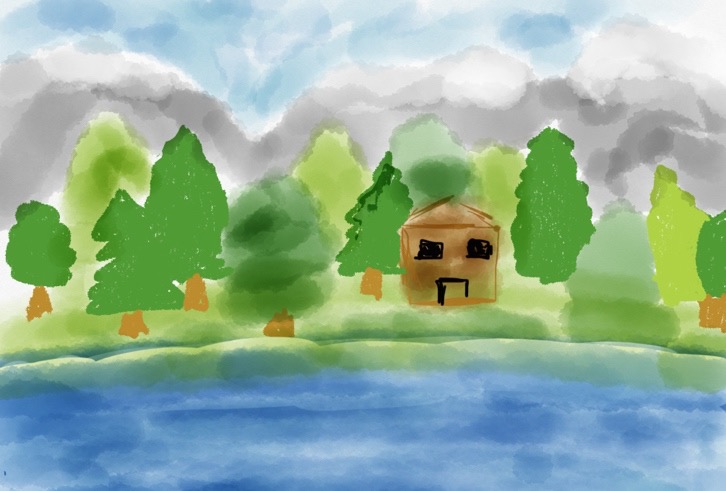
Cabin by the Lake ~ Digital Art
Hi my name is Samoa and today i'm going to tell you how I created my picture. First, I was looking through sketching or drawing apps and I came across this app called Tayasui Sketches. What interested me was the amazing picture of the two fish in a pond and I also saw that the rating was five and a half stars, which means that it is a good app to use. To create this picture I used a stylus.
After the app was done downloading, I could not wait to start drawing. I opened it and started drawing and it was so amazing there were so many different features to choose from. There was a pencil, brush, oil pastel, watercolor, marker, pen, and fine tip pen, my favorite one is the watercolor brush. They all have such realistic features. Also, there are many colors to choose from and if you can't find the color you are looking for, you can just click on the add button and create your own color you can also delete any color.
First, to create this picture, I chose what feature I wanted, which was the paint brush. Depending on the stroke of your hand is how thick or thin the line will be for the paint brush. After I chose the paint brush I chose the color I wanted which was green. I started by drawing a regular thin line across the ipad. Then I switched over to the watercolor and colored the top of the line about half way up the screen, I used two different shades of green ( light green and dark green). Depending on how many times you go over the watercolor is how dark the color will be. I then used a brown shade to create the house and the pen (black) to use for the windows and door. Next, I used a dark green color and drew a few triangles on top of each other and moved the stylus from side to side going down creating the trees of all sizes and colors. I continued doing this by switching from the oil pastel to the pen and marker to create the tree trunks. In the blank space below I used the watercolor brush in a dark and light blue color to create the water. I used long and short strokes to make the water look more realistic. After this, I changed the color to a gray and painted large gray triangles but still left some space at the top of the screen. I colored the gray in with gary then a little blue and white, this stood for foggy mountains. I then just colored the rest of the top part of the screen with a light blue for the sky.
Henry Moss Middle School, 7th grade
Cabin by the Lake ~ Digital Art
Hi my name is Samoa and today i'm going to tell you how I created my picture. First, I was looking through sketching or drawing apps and I came across this app called Tayasui Sketches. What interested me was the amazing picture of the two fish in a pond and I also saw that the rating was five and a half stars, which means that it is a good app to use. To create this picture I used a stylus.
After the app was done downloading, I could not wait to start drawing. I opened it and started drawing and it was so amazing there were so many different features to choose from. There was a pencil, brush, oil pastel, watercolor, marker, pen, and fine tip pen, my favorite one is the watercolor brush. They all have such realistic features. Also, there are many colors to choose from and if you can't find the color you are looking for, you can just click on the add button and create your own color you can also delete any color.
First, to create this picture, I chose what feature I wanted, which was the paint brush. Depending on the stroke of your hand is how thick or thin the line will be for the paint brush. After I chose the paint brush I chose the color I wanted which was green. I started by drawing a regular thin line across the ipad. Then I switched over to the watercolor and colored the top of the line about half way up the screen, I used two different shades of green ( light green and dark green). Depending on how many times you go over the watercolor is how dark the color will be. I then used a brown shade to create the house and the pen (black) to use for the windows and door. Next, I used a dark green color and drew a few triangles on top of each other and moved the stylus from side to side going down creating the trees of all sizes and colors. I continued doing this by switching from the oil pastel to the pen and marker to create the tree trunks. In the blank space below I used the watercolor brush in a dark and light blue color to create the water. I used long and short strokes to make the water look more realistic. After this, I changed the color to a gray and painted large gray triangles but still left some space at the top of the screen. I colored the gray in with gary then a little blue and white, this stood for foggy mountains. I then just colored the rest of the top part of the screen with a light blue for the sky.