Digital Art Products
Samoa Gaoa, 8th grade
Henry Moss Middle School
Digital Art Product
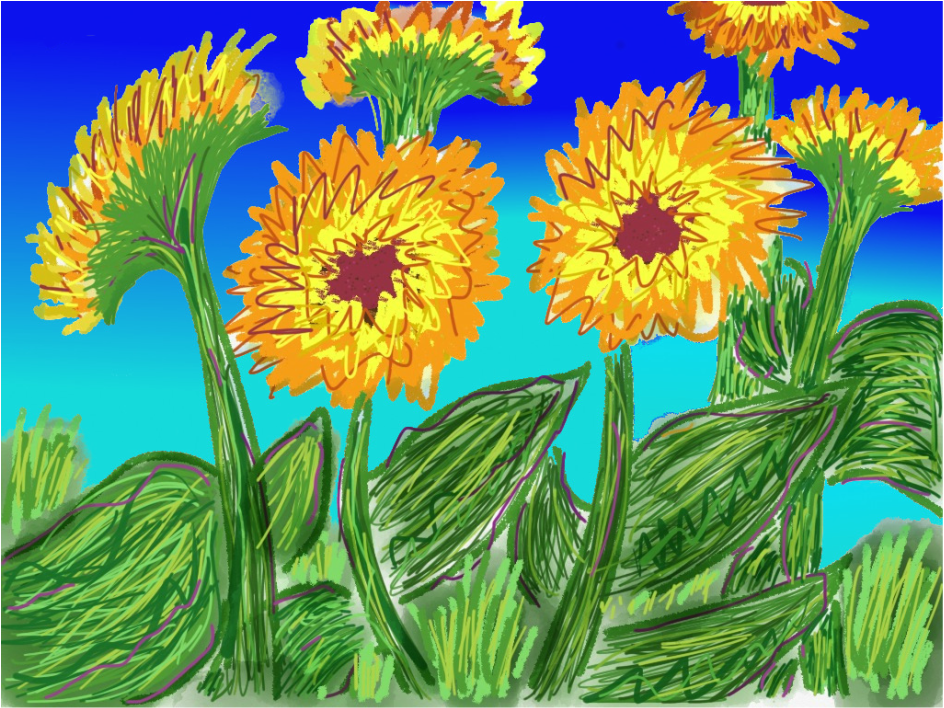
Wildflower
Hi my name is Samoa and I'm going to tell you how I created my digital art piece. First, I was looking through sketching and drawing apps, and I came across an app called Tayasui Sketches. What interested me was the amazing picture of the two fish in a pond! I saw the rating was five and a half stars, which means that it’s a good app to use. To create this picture I used a stylus and many different drawing tools.
After I installed the app, I could not wait to start drawing! I opened it and started sketching random things right away. It was amazing and there were so many different drawing utensils to choose from. There was a pencil, brush, oil pastel, watercolor, marker, pen and fine tip pen; my favorite is the watercolor brush. There are many colors to choose from, and if you can't find the color you are looking for, you can just click on the add button and create your own color.
To create this picture, I chose what feature I wanted, which was the pastel crayon. After I chose the pastel crayon, I chose the color I wanted which was orange. I started drawing the basic shape of the flowers by using many different shades of orange, red, yellow, and burgundy, and layering them on top of one another. I also switched the coloring utensil to make the flowers look more realistic and have more dimension.
When the flowers were done, I started to draw the stems and leaves by using the pencil and many different shades of green and a little bit of purple. Then I switched to the watercolor brush and just filled in all the empty spaces on the stems and leaves with green. After I was completely done drawing all of the flowers, and I was happy with how they looked, I saved and downloaded the picture into my google drive. I opened the picture in google drive and started to edit it in Pixlr Editor. I wanted the background, or the sky to really make the flowers stand out, so I looked for a gradient utensil. I made the background a gradient of dark blue going to light blue for the sky. Since I had already drawn the flowers and didn't start off with the background, I had to do separate parts at a time and make of the background until I was happy with the results.
After I was completely done, I went to Google Classroom and went to my schools STLP classroom. I scrolled down until I found were it said digital art and I clicked on it and uploaded my picture. This is the process that went through to create my picture.
Henry Moss Middle School
Digital Art Product
Wildflower
Hi my name is Samoa and I'm going to tell you how I created my digital art piece. First, I was looking through sketching and drawing apps, and I came across an app called Tayasui Sketches. What interested me was the amazing picture of the two fish in a pond! I saw the rating was five and a half stars, which means that it’s a good app to use. To create this picture I used a stylus and many different drawing tools.
After I installed the app, I could not wait to start drawing! I opened it and started sketching random things right away. It was amazing and there were so many different drawing utensils to choose from. There was a pencil, brush, oil pastel, watercolor, marker, pen and fine tip pen; my favorite is the watercolor brush. There are many colors to choose from, and if you can't find the color you are looking for, you can just click on the add button and create your own color.
To create this picture, I chose what feature I wanted, which was the pastel crayon. After I chose the pastel crayon, I chose the color I wanted which was orange. I started drawing the basic shape of the flowers by using many different shades of orange, red, yellow, and burgundy, and layering them on top of one another. I also switched the coloring utensil to make the flowers look more realistic and have more dimension.
When the flowers were done, I started to draw the stems and leaves by using the pencil and many different shades of green and a little bit of purple. Then I switched to the watercolor brush and just filled in all the empty spaces on the stems and leaves with green. After I was completely done drawing all of the flowers, and I was happy with how they looked, I saved and downloaded the picture into my google drive. I opened the picture in google drive and started to edit it in Pixlr Editor. I wanted the background, or the sky to really make the flowers stand out, so I looked for a gradient utensil. I made the background a gradient of dark blue going to light blue for the sky. Since I had already drawn the flowers and didn't start off with the background, I had to do separate parts at a time and make of the background until I was happy with the results.
After I was completely done, I went to Google Classroom and went to my schools STLP classroom. I scrolled down until I found were it said digital art and I clicked on it and uploaded my picture. This is the process that went through to create my picture.
Maddi Wilson, 8th grade
Henry Moss Middle School
Digital Art Product
What's Your Sign
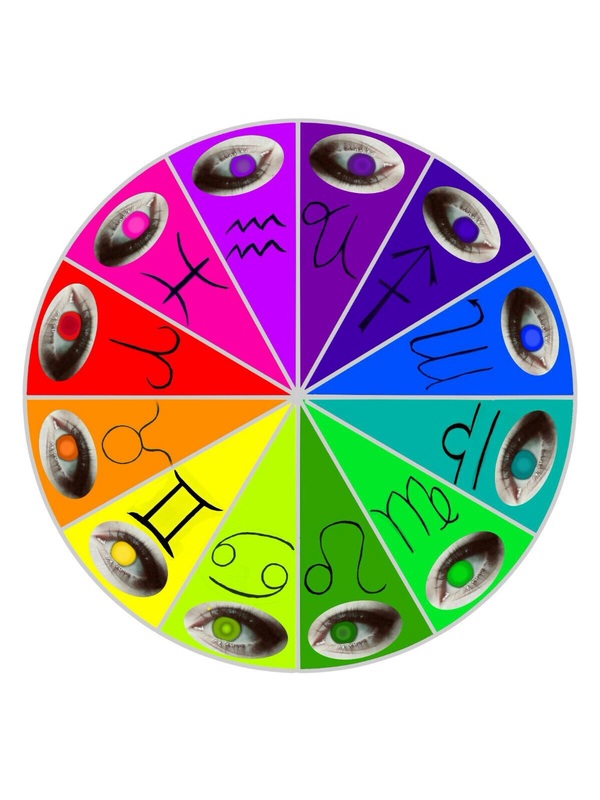
For this project, I used my nook and three apps on my phone. I only used one person’s eye to represent each of the symbols and colors of the twelve zodiac signs.I got my original photo, "the eye," from one of my friends. To make the skin color whiter and to make the color of the eye pop more, I used Picsart, and used their “Seafoam” filter on the original image. I then used their drawing application to paint on the colors. I used a 70% opacity so it didn’t look like a few random dots on the eye that didn’t blend in together at all.. On each eye, I used the common chart color that matched the sign, and then I used a lighter shade of the selected color for the second layer. Some of the eyes have three layers, I used the original color, a lighter shade for a portion, and a shade that was darker than the original color for an even smaller portion.
For the scale/chart/big circle the images are placed on, I used the app, Mediabang on my nook. I used the snap tool to draw the circle, and the straight lines dividing the circle into twelve slices. I used their paint bucket tool to fill each slice with a different color. Red, pink, purple, ultra violet, indigo, blue, teal, lime green, forest green, chartreuse, yellow, and orange.
After finishing that, I used Picsart to crop them into the shapes and to add the photos to the chart.
For the symbols, I actually drew them on white sheets of printer paper, using a black sharpie to make thick lines. I took a picture of each symbol I drew and uploaded them to Picsart. I chose to use the “darken” effect to eliminate all of the white in the image, leaving the black sign with a transparent background. I set them on the chart accordingly, matching the signs with their colors.
Henry Moss Middle School
Digital Art Product
What's Your Sign
For this project, I used my nook and three apps on my phone. I only used one person’s eye to represent each of the symbols and colors of the twelve zodiac signs.I got my original photo, "the eye," from one of my friends. To make the skin color whiter and to make the color of the eye pop more, I used Picsart, and used their “Seafoam” filter on the original image. I then used their drawing application to paint on the colors. I used a 70% opacity so it didn’t look like a few random dots on the eye that didn’t blend in together at all.. On each eye, I used the common chart color that matched the sign, and then I used a lighter shade of the selected color for the second layer. Some of the eyes have three layers, I used the original color, a lighter shade for a portion, and a shade that was darker than the original color for an even smaller portion.
For the scale/chart/big circle the images are placed on, I used the app, Mediabang on my nook. I used the snap tool to draw the circle, and the straight lines dividing the circle into twelve slices. I used their paint bucket tool to fill each slice with a different color. Red, pink, purple, ultra violet, indigo, blue, teal, lime green, forest green, chartreuse, yellow, and orange.
After finishing that, I used Picsart to crop them into the shapes and to add the photos to the chart.
For the symbols, I actually drew them on white sheets of printer paper, using a black sharpie to make thick lines. I took a picture of each symbol I drew and uploaded them to Picsart. I chose to use the “darken” effect to eliminate all of the white in the image, leaving the black sign with a transparent background. I set them on the chart accordingly, matching the signs with their colors.