Technical Writing Products
Ngoc Nguyen, 8th grade
Henry Moss Middle School
Technical Writing
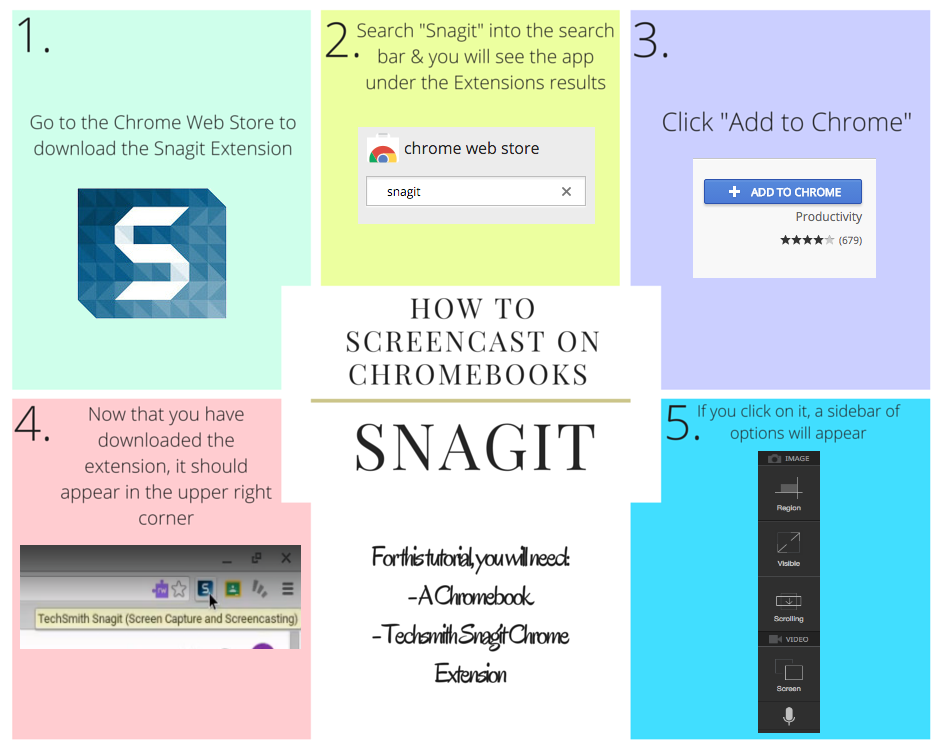
How to Screencast on Chromebooks with Snagit
This Technical Writing Piece was created to go along with our STLP showcase project where we taught students and teachers in the building and our community how to use Google Drive through video tutorials. We used a free and user-friendly Chrome Extension screencasting program called Snagit to record our Chromebook screens. I decided to create a writing piece to place on the presentation board and to assist students who wanted to learn how to make videos using the extension so they could receive fast and clear instructions to save time.
First, I had to experiment with the app just in case there were any other important features that I didn’t know about. After I decided I had all of the information I needed, I planned the steps for the writing piece using a storyboard. I used that to guide me while capturing screenshot images of the Snagit Chrome Extension and the important parts of the app.
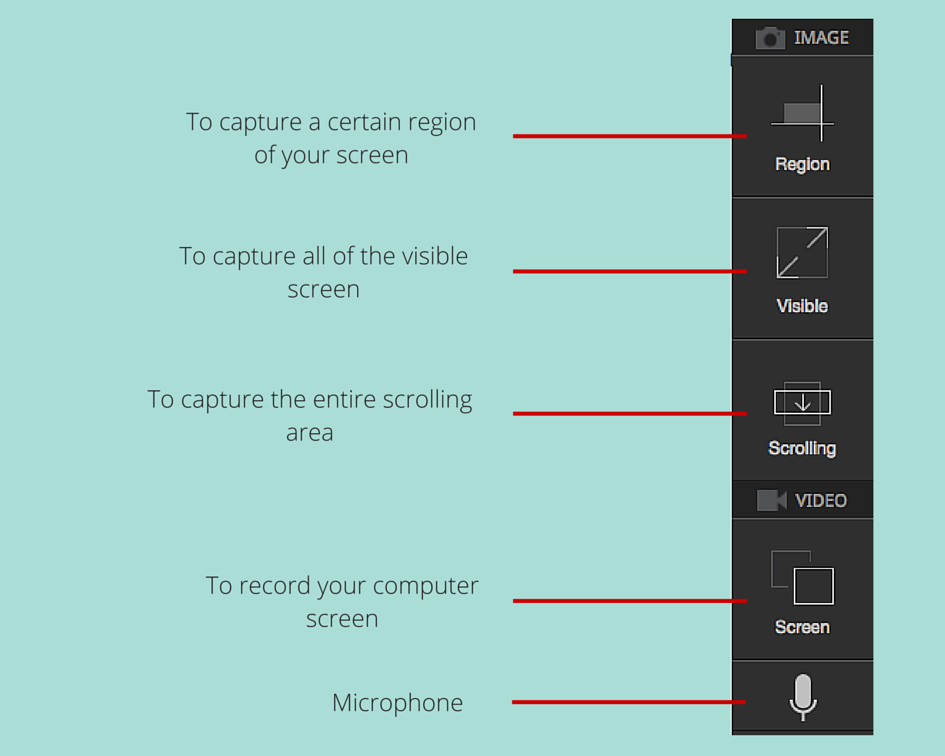
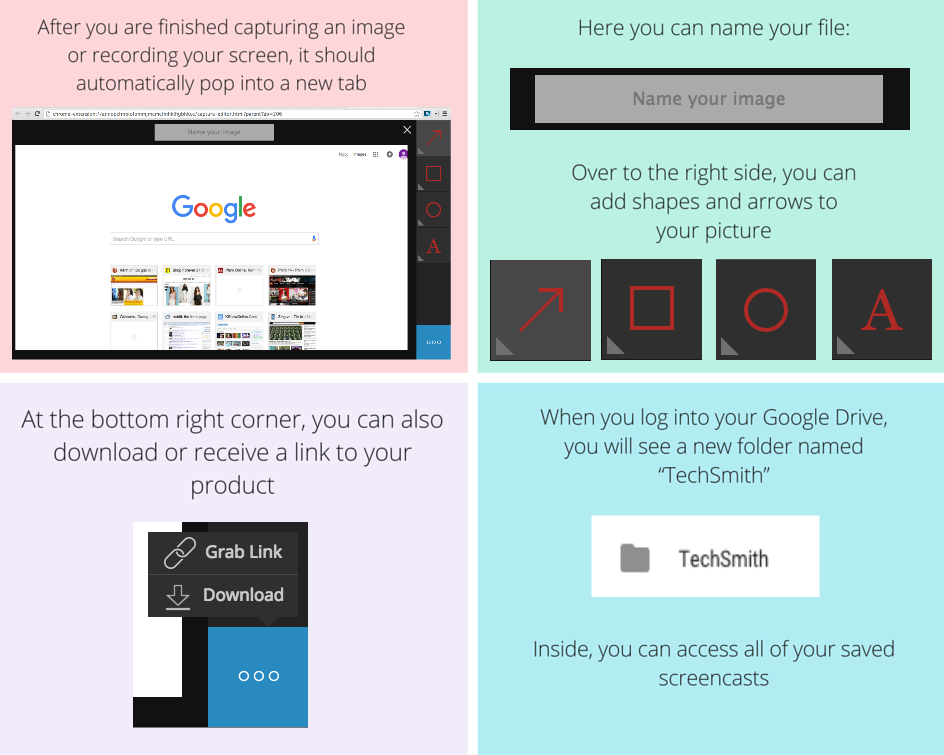
I collected my pictures and information to start my piece on Pixlr, a photo editing website. I decided to keep the writing piece simple and easy to follow along with helpful images and diagrams. I used a collage like template and filled each box with a solid color. I then typed in the different instructions in each of the correlating boxes. The first set of instructions neatly listed the materials you need and explained how to download and open the extension. I made a diagram of the functions of the tools that followed to quickly tell about the toolbar. The third set of instructions explains how you edit your screenshots and how you share or access your products. I added the pictures and the diagram to finish the product.
A difficulty was that I had to use a variety of programs to create my piece including Snagit, Pixlr, and Canva. Initially, I wanted to do my whole technical writing on Canva.com but it would only allow me to put whole pictures in the different boxes. I then filled the boxes with different colors and saved them to the computer. I thought to add the texts and pictures using Pixlr and that’s where I finished my technical writing piece. Another difficulty I had was fitting all of the instructions inside the box. I had to take small screenshots so they could be seen clearly and write clear and precise instructions.
It was neat to go through my creativity process! I started with having no idea how I was going to start or set up the writing piece. I knew I didn’t want to do a plain typed one because that is boring and unimaginative so I played around on Canva to see the different options they had. Once I started I couldn’t stop and just had so many ideas!
All images used throughout the technical writing piece are screenshots taken by me in the Snagit extension using an iMac computer.
Henry Moss Middle School
Technical Writing
How to Screencast on Chromebooks with Snagit
This Technical Writing Piece was created to go along with our STLP showcase project where we taught students and teachers in the building and our community how to use Google Drive through video tutorials. We used a free and user-friendly Chrome Extension screencasting program called Snagit to record our Chromebook screens. I decided to create a writing piece to place on the presentation board and to assist students who wanted to learn how to make videos using the extension so they could receive fast and clear instructions to save time.
First, I had to experiment with the app just in case there were any other important features that I didn’t know about. After I decided I had all of the information I needed, I planned the steps for the writing piece using a storyboard. I used that to guide me while capturing screenshot images of the Snagit Chrome Extension and the important parts of the app.
I collected my pictures and information to start my piece on Pixlr, a photo editing website. I decided to keep the writing piece simple and easy to follow along with helpful images and diagrams. I used a collage like template and filled each box with a solid color. I then typed in the different instructions in each of the correlating boxes. The first set of instructions neatly listed the materials you need and explained how to download and open the extension. I made a diagram of the functions of the tools that followed to quickly tell about the toolbar. The third set of instructions explains how you edit your screenshots and how you share or access your products. I added the pictures and the diagram to finish the product.
A difficulty was that I had to use a variety of programs to create my piece including Snagit, Pixlr, and Canva. Initially, I wanted to do my whole technical writing on Canva.com but it would only allow me to put whole pictures in the different boxes. I then filled the boxes with different colors and saved them to the computer. I thought to add the texts and pictures using Pixlr and that’s where I finished my technical writing piece. Another difficulty I had was fitting all of the instructions inside the box. I had to take small screenshots so they could be seen clearly and write clear and precise instructions.
It was neat to go through my creativity process! I started with having no idea how I was going to start or set up the writing piece. I knew I didn’t want to do a plain typed one because that is boring and unimaginative so I played around on Canva to see the different options they had. Once I started I couldn’t stop and just had so many ideas!
All images used throughout the technical writing piece are screenshots taken by me in the Snagit extension using an iMac computer.